> For the complete documentation index, see [llms.txt](https://portalista.gitbook.io/portalista-manual-2/llms.txt). Markdown versions of documentation pages are available by appending `.md` to page URLs; this page is available as [Markdown](https://portalista.gitbook.io/portalista-manual-2/captive-portal-preview-and-information/tourist-attraction.md).

# Tourist Attraction

Create attractions, organize templates and display them on a Captive Portal, with an Arunthara City Wi-Fi example.

Tourist Attraction lets Wi-Fi visitors discover nearby places from a Captive Portal, including parks, markets, museums and viewpoints. Administrators create attraction records, collect them in a template and assign the template to one or more Captive Portals.

Visitors select **Tourist attractions** to explore the collection and **Back to Wi-Fi** to return to the login form.

### Before you begin

The Dashboard must have the Tourist Attraction feature enabled. Your administrator account needs access to the feature and the Captive Portals you want to configure. **Read-only** accounts can view information but cannot create, edit or delete it.

Prepare the names, descriptions, photos and contact details for your places. To display a map button, also prepare each place’s latitude and longitude.

### 1. Create an attraction

1. Open **Tourist Attraction** from the dashboard menu.
2. Select **Attractions**, then **New attraction**.
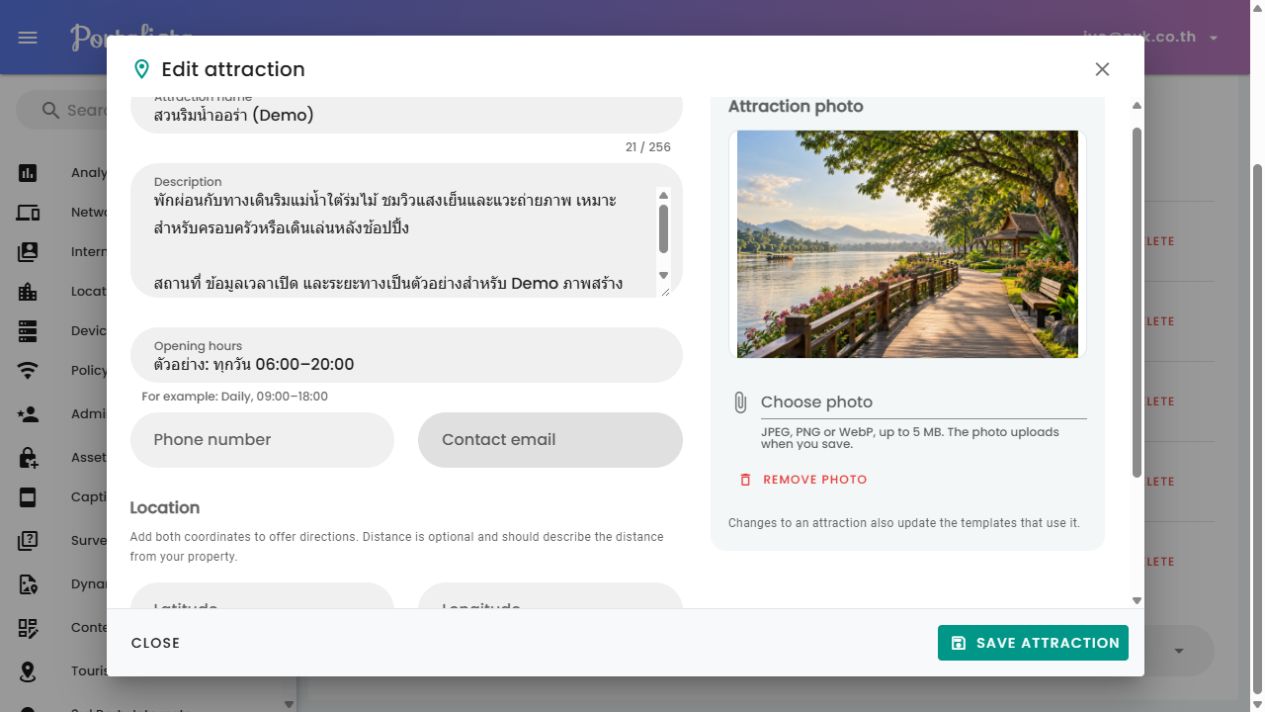
3. Enter a unique **Attraction name\***.
4. Add the optional details listed below.
5. Select **Choose photo** and check the image preview.
6. Select **Save attraction** to save the information and upload the photo.

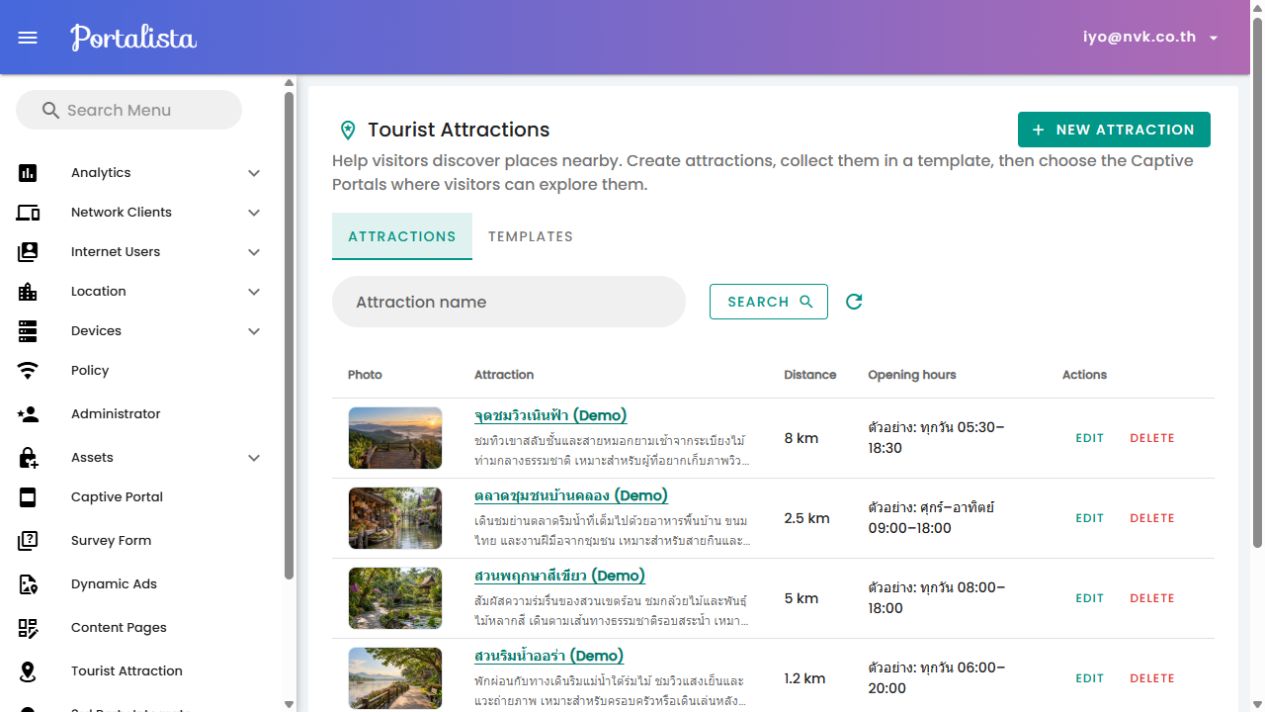
<figure><img src="https://content.gitbook.com/content/PH8BiCr2zyKqC7CL3Dxv/blobs/3OEwHhSsDPINqV8kr43k/01-attractions-list.png" alt="Tourist Attractions screen showing the attraction library"><figcaption><p>The Attractions table shows photos, names, distances and opening hours.</p></figcaption></figure>

| Field                | What to enter                                                                                    |
| -------------------- | ------------------------------------------------------------------------------------------------ |
| Attraction name\*    | The place name shown to visitors; must be unique within the Dashboard                            |
| Description          | An introduction or highlights                                                                    |
| Opening hours        | For example, “Daily, 09:00–18:00”                                                                |
| Phone number         | An optional contact number                                                                       |
| Contact email        | An optional contact email address                                                                |
| Latitude / Longitude | Enter both coordinates, or leave both blank                                                      |
| Distance (km)        | A distance from your property entered manually in kilometres; it is not calculated automatically |

Photos must be **JPEG, PNG or WebP, up to 5 MB**. Uploading takes place when you select Save attraction. If the details are saved but the upload fails, the editor explains how to select another image or retry.

The visitor card includes **View on map** only when both coordinates are provided. The link opens the location in Google Maps.

<figure><img src="https://content.gitbook.com/content/PH8BiCr2zyKqC7CL3Dxv/blobs/2mAhJj8hIX4SKIh3YomL/02-attraction-form.png" alt="Attraction editor with place details and photo preview"><figcaption><p>Enter the place details and review the selected photo before saving.</p></figcaption></figure>

### 2. Create and assign a template

A template is a collection of attractions displayed together.

1. Select **Templates**, then **New template**.
2. Enter **Template name\***. Choose a visitor-friendly name: this becomes the collection heading.
3. Use **Add an attraction** to select at least one saved place.
4. Review the selected places. Use × to remove an unwanted selection.
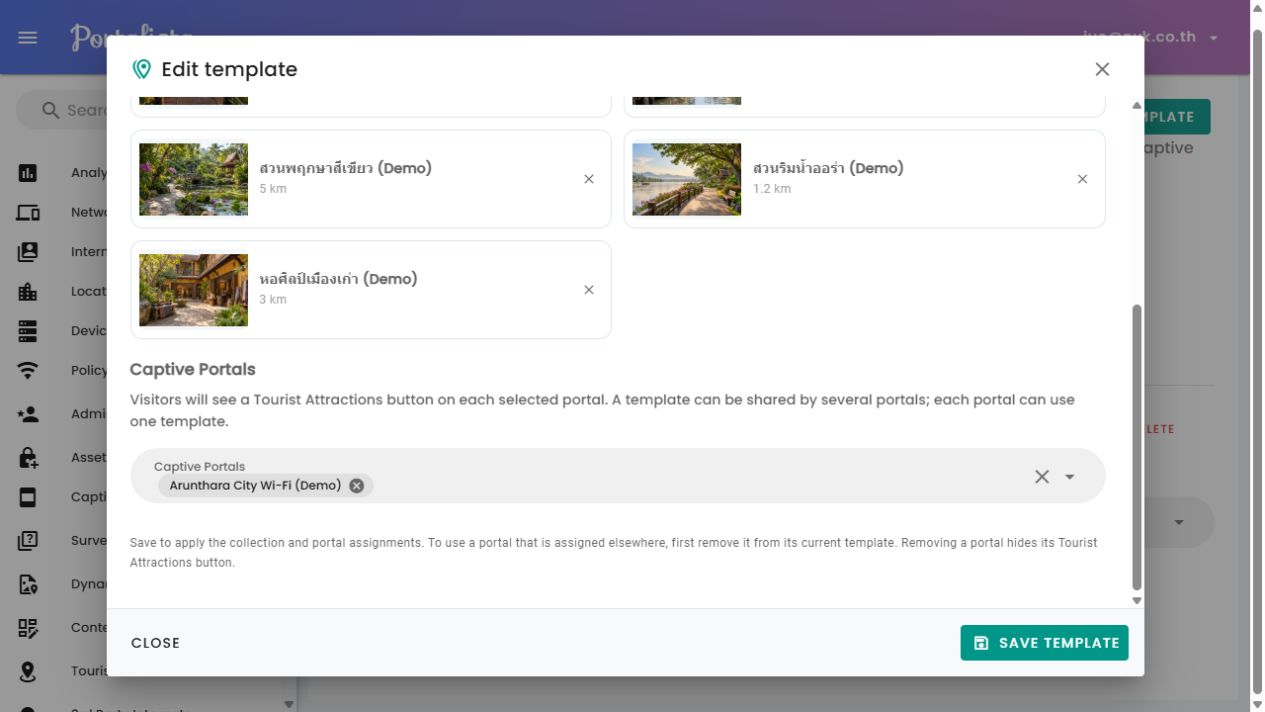
5. Select the required **Captive Portals**.
6. Select **Save template** to save the collection and portal assignments.
7. Check the portal names in the table’s **Captive Portals** column.

A template can be shared by several portals. Each portal can use only one attraction template at a time. A portal assigned elsewhere shows **Assigned to…** and cannot be selected. Remove it from its previous template and save that change before assigning it to another template.

You can save a template without assigning a portal. Its status in the table is **Not assigned**, and visitors will not see that collection through a portal yet.

<figure><img src="https://content.gitbook.com/content/PH8BiCr2zyKqC7CL3Dxv/blobs/vuni9dUWuUHvtF3Bg4tK/03-template-binding.png" alt="Template editor with selected places and assigned Captive Portal"><figcaption><p>Select the places and assign the template to Arunthara City Wi-Fi (Demo), then select Save template.</p></figcaption></figure>

### 3. Check the visitor experience

1. Open or reload the assigned Captive Portal.
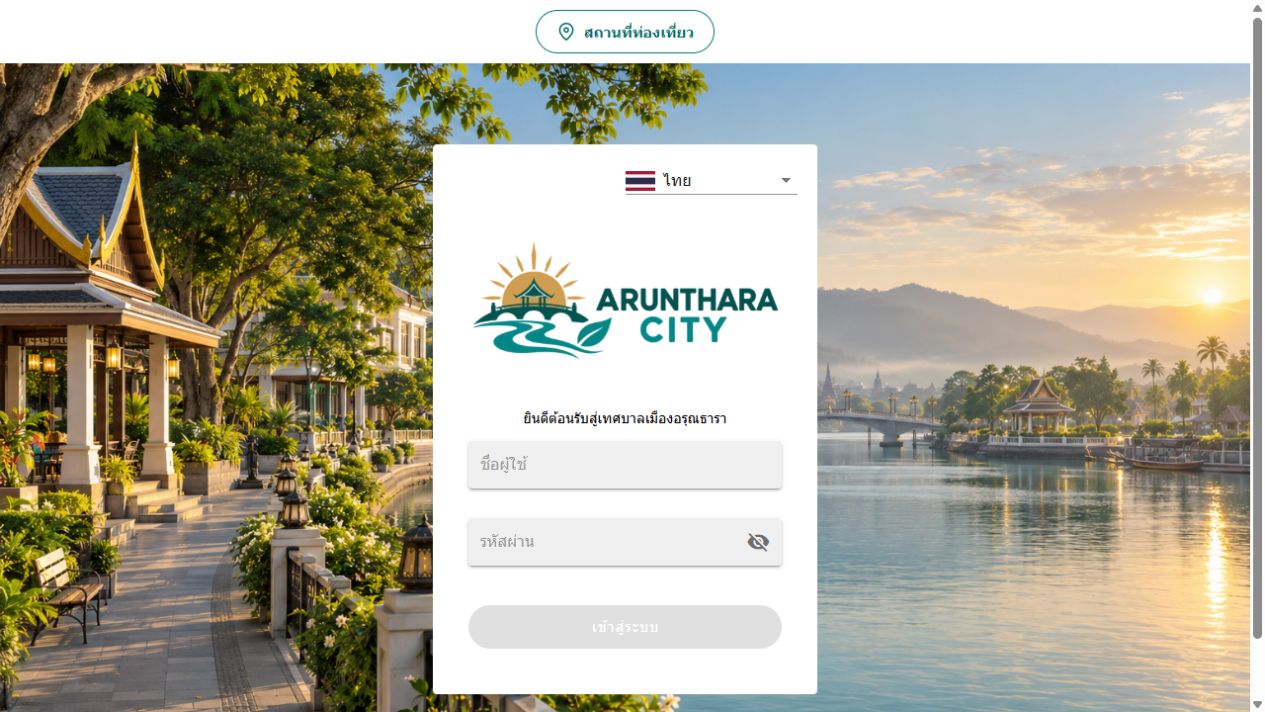
2. Check that the **Tourist attractions** button is visible.
3. Select the button to open the collection.
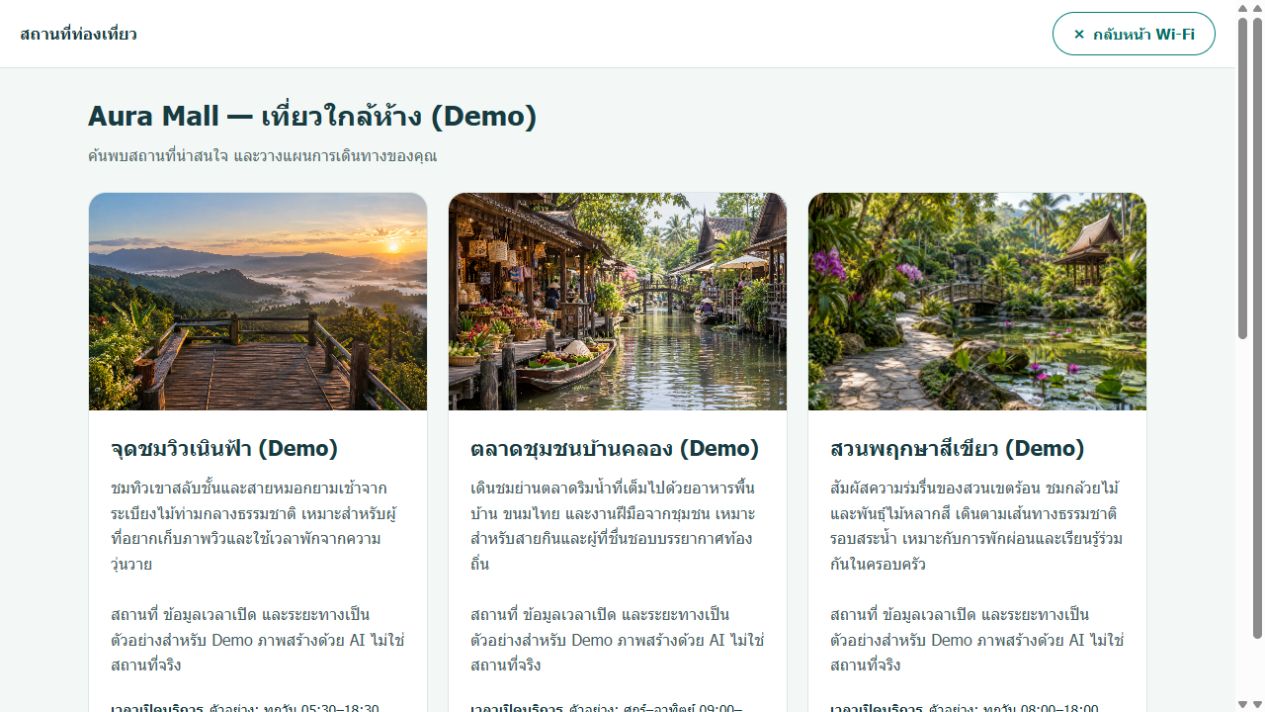
4. Check the photos, names, descriptions, opening hours and distances.
5. Test **View on map** if coordinates are present. It opens the place in Google Maps.
6. Select **Back to Wi-Fi** to return to the login form.

<figure><img src="https://content.gitbook.com/content/PH8BiCr2zyKqC7CL3Dxv/blobs/uufbg9xR80lch4vtecEC/04-visitor-portal.png" alt="Arunthara City Captive Portal with the Tourist attractions button"><figcaption><p>The assigned Captive Portal displays a button for exploring the attraction collection.</p></figcaption></figure>

The collection opens separately from the login form. Returning preserves values already entered in the form.

Interface labels follow the portal language: Thai or English. Attraction names and descriptions appear as entered by the administrator; they are not translated automatically.

<figure><img src="https://content.gitbook.com/content/PH8BiCr2zyKqC7CL3Dxv/blobs/iuLqT5v2XKzWJO5r8c25/05-visitor-attractions.png" alt="Visitor attraction collection opened from the Captive Portal"><figcaption><p>Visitors can explore the places and return to Wi-Fi login when ready.</p></figcaption></figure>

### 4. Update or remove content

* **Edit a place:** Open its name or select Edit, make changes and select Save attraction. The changes apply to all templates using that attraction.
* **Replace a photo:** Select Choose photo and Save attraction.
* **Remove a photo:** Select Remove photo and confirm. This takes effect immediately across templates using the place.
* **Remove a place from a template:** Select × beside the place and Save template. The attraction remains in the library.
* **Hide the visitor button:** Remove the portal from the template’s Captive Portals field and Save template. Reload the portal to check the result.
* **Delete a template:** Remove all portal assignments and save before selecting Delete.
* **Delete an attraction:** First remove it from every template, then select Delete in Attractions.

The editor requires at least one place in each template. To remove its last place, replace it with another attraction, or detach and delete the unused template first.

Saving applies the changes directly; there is no separate Publish step. Reload the visitor portal after making changes to verify the result.

### 5. Troubleshooting

| Issue                              | What to check                                                           |
| ---------------------------------- | ----------------------------------------------------------------------- |
| Tourist Attraction menu is missing | Dashboard feature availability and administrator permissions            |
| Editing is unavailable             | Whether the account is read-only                                        |
| A portal cannot be selected        | Existing template assignment and the account’s portal permissions       |
| The visitor button is missing      | Saved template assignment, selected attractions and a fresh portal load |
| View on map is missing             | Both latitude and longitude must be present                             |
| A record cannot be deleted         | Existing template use or portal assignments                             |

### Example used in this guide

The **Arunthara City Wi-Fi (Demo)** portal uses **Aura Mall — เที่ยวใกล้ห้าง (Demo)** with five sample attractions: สวนริมน้ำออร่า, ตลาดชุมชนบ้านคลอง, หอศิลป์เมืองเก่า, สวนพฤกษาสีเขียว and จุดชมวิวเนินฟ้า.

The municipality and attractions are fictional, the photographs are AI-generated, and the hours and distances are demonstration data. No real coordinates have been entered, so this demo does not display map buttons.