> For the complete documentation index, see [llms.txt](https://portalista.gitbook.io/portalista-manual-2/llms.txt). Markdown versions of documentation pages are available by appending `.md` to page URLs; this page is available as [Markdown](https://portalista.gitbook.io/portalista-manual-2/captive-portal-preview-and-information/survey-forms.md).

# Survey Forms

Create a shopping mall survey, configure bilingual questions and choices, connect a Captive Portal, and read or export the results.

Survey Forms lets you ask Wi-Fi visitors about their visit, interests and experience through a Captive Portal. This guide creates a short shopping mall survey, connects it to a supported portal, and explains how to read the results.

**Example form:** Shopping Mall - Visitor Experience (Demo) contains four questions in Thai and English. It illustrates the complete workflow from creating questions and assigning a Captive Portal to reading the results. Adapt the wording and choices to suit your venue.

### 1. Create a survey form

1. Open the required dashboard and select **Survey Form** from the menu. The page heading is **Survey Forms**.
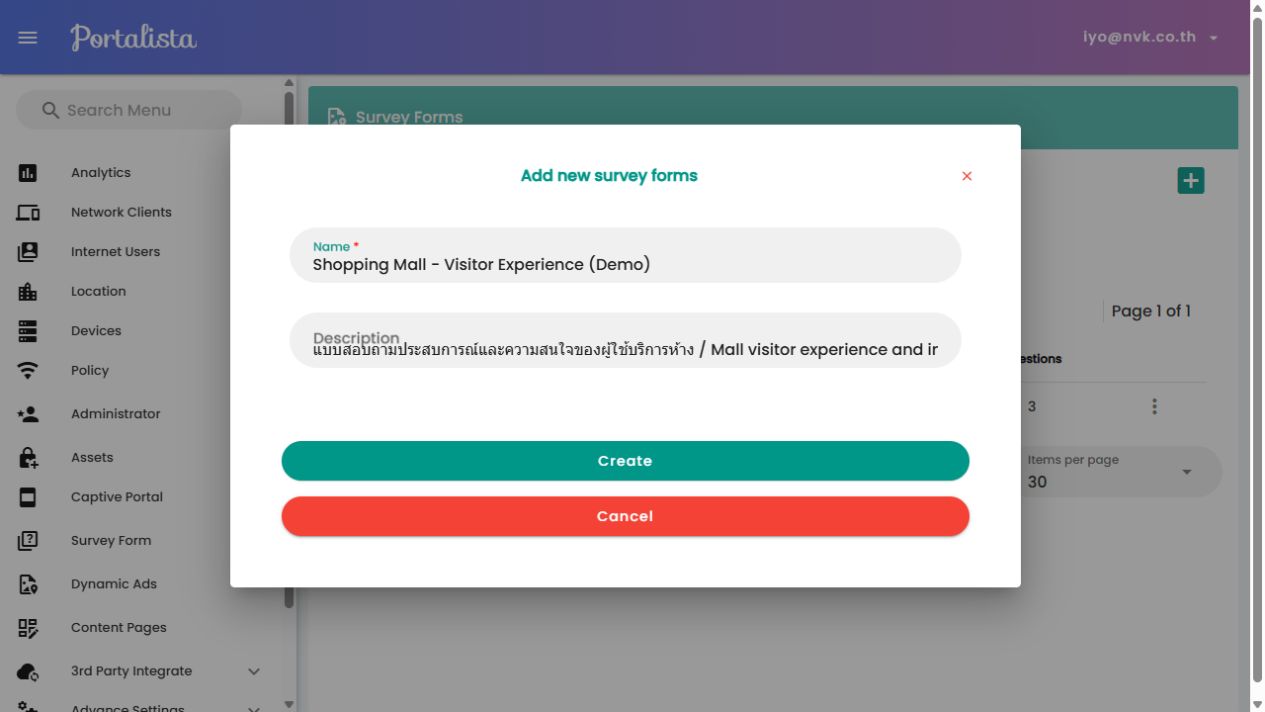
2. Click the **+** button to add a form.
3. Enter **Shopping Mall - Visitor Experience (Demo)** in **Name**, or use another unique name for your campaign.
4. Add an optional **Description**, such as “Shopping mall visitor experience survey — Thai and English.”
5. Click **Create**. Find the new form in the list, open its action menu, and select **Manage Questions**.

If Survey Form is missing, ask the dashboard owner to check that the feature is enabled and that your administrator account can access Survey Form. You also need permission to manage the target Captive Portal when assigning the form.

<figure><img src="https://files.gitbook.com/v0/b/gitbook-x-prod.appspot.com/o/spaces%2F6Cj4Z4IgrnDp0c2yiDx4%2Fuploads%2FmJXWavlD9prqOqhITE14%2F01-create-form.jpg?alt=media&#x26;token=b9436b1f-5e04-40ed-966c-cd9b7ffc538f" alt="Create the Shopping Mall - Visitor Experience (Demo) form from Survey Forms." width="1265"><figcaption><p>Create the Shopping Mall - Visitor Experience (Demo) form from Survey Forms.</p></figcaption></figure>

### 2. Add questions for a shopping mall

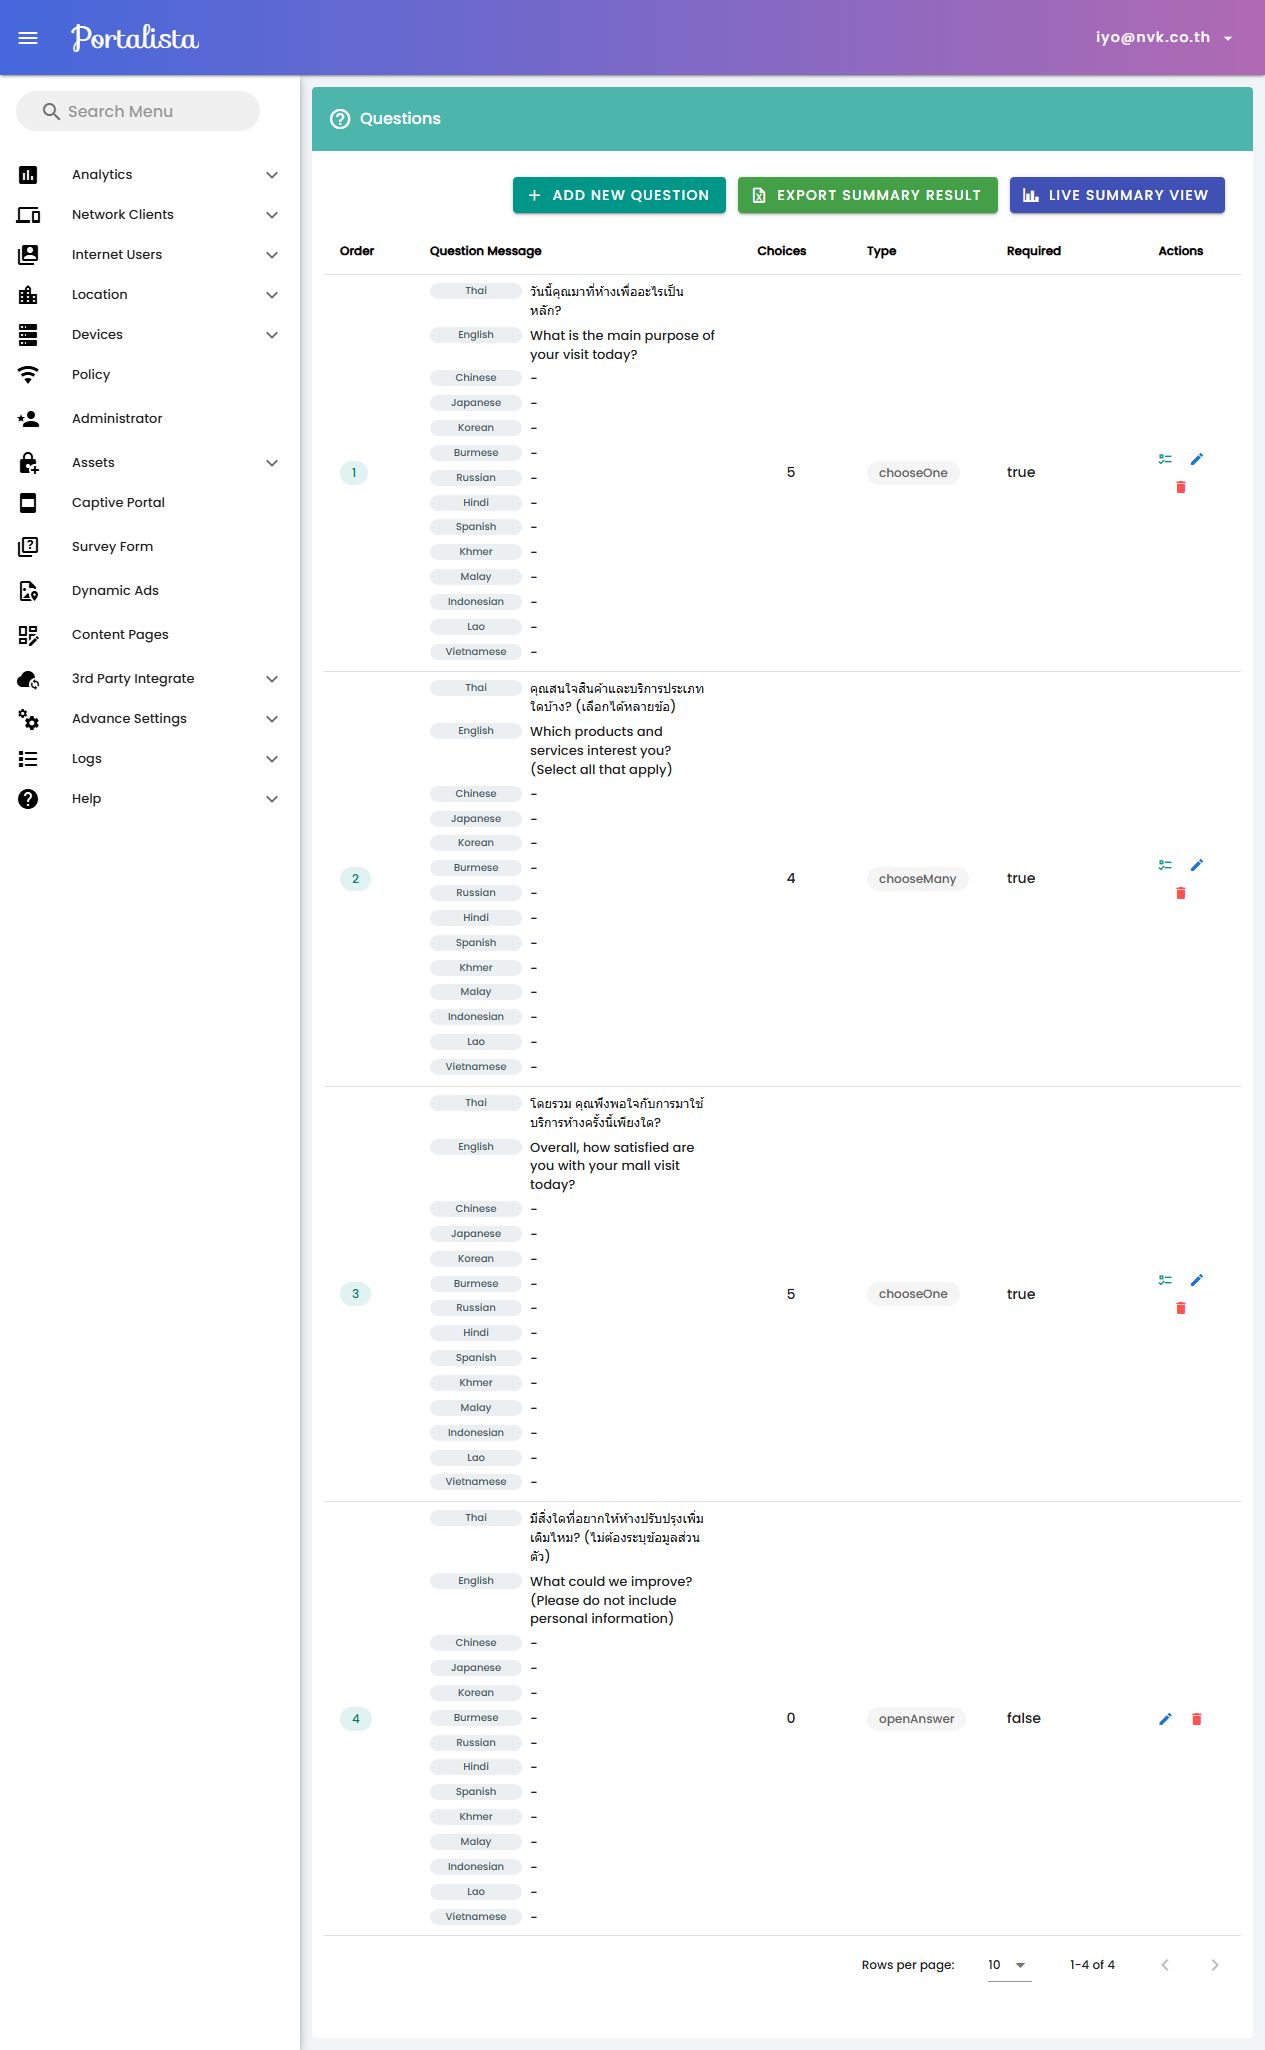
Keep the survey short. The example uses three required questions and one optional suggestion, covering the reason for visiting, preferred categories and overall satisfaction.

| Order | Type and requirement   | Question                                                            | Choices                                                                        |
| ----- | ---------------------- | ------------------------------------------------------------------- | ------------------------------------------------------------------------------ |
| 1     | Choose One · Required  | What is the main purpose of your visit today?                       | Shopping; Dining or cafés; Movies or activities; Services or errands; Other.   |
| 2     | Choose Many · Required | Which products and services interest you? (Select all that apply)   | Fashion and beauty; Food and cafés; Technology and lifestyle; Kids and family. |
| 3     | Choose One · Required  | Overall, how satisfied are you with your mall visit today?          | Very satisfied; Satisfied; Neutral; Dissatisfied; Very dissatisfied.           |
| 4     | Open Answer · Optional | What could we improve? (Please do not include personal information) | No choices. Visitors enter their own text.                                     |

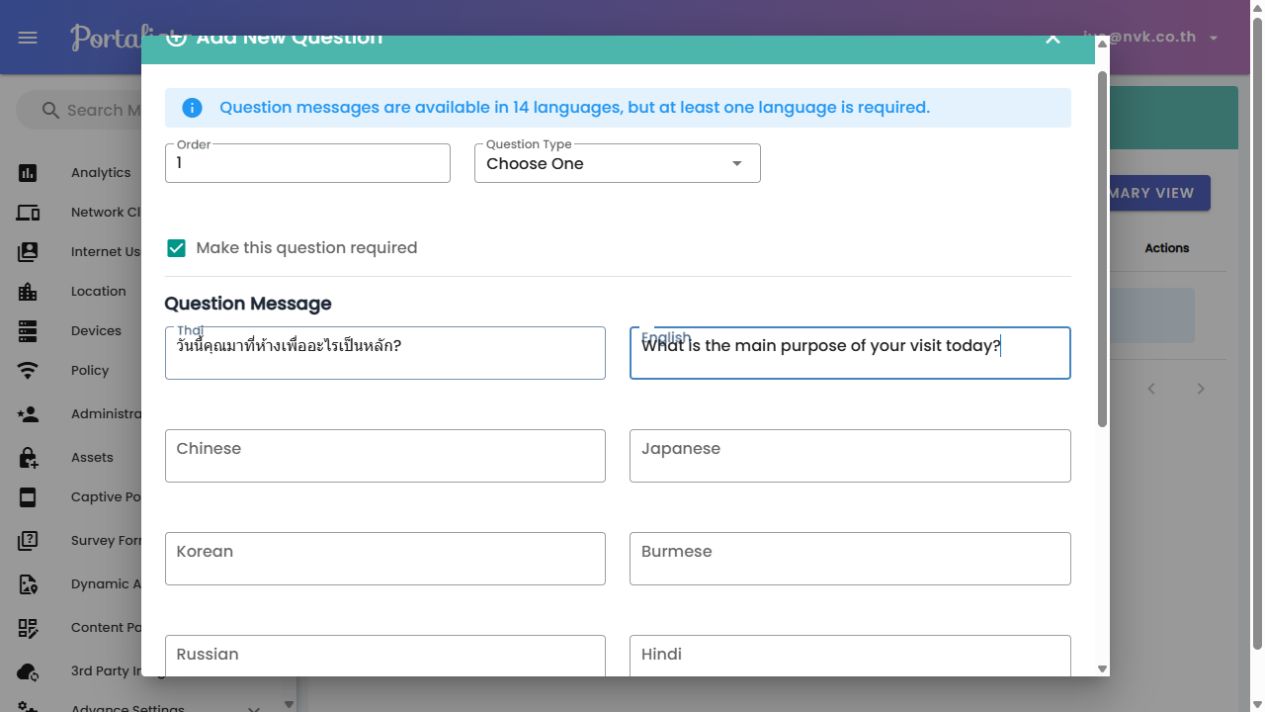
1. Click **Add New Question**.
2. Enter a unique **Order**, starting with 1. The editor accepts values from 1 to 50.
3. Select the **Question Type**: **Choose One** for one answer, **Choose Many** for multiple answers, or **Open Answer** for free text.
4. Enable **Make this question required** for questions 1–3. Leave it off for question 4.
5. Under **Question Message**, enter the question in the relevant language fields, then click **Save Question**.

The editor supports 14 languages and requires at least one message. This example includes both **Thai** and **English**. Enter translations for the languages your portal offers, including the answer choices; translations are not generated automatically.

<figure><img src="https://files.gitbook.com/v0/b/gitbook-x-prod.appspot.com/o/spaces%2F6Cj4Z4IgrnDp0c2yiDx4%2Fuploads%2Fj0xblnEa4Y06CJ3b1hys%2F02-question.jpg?alt=media&#x26;token=48545548-3629-40c2-a97a-bf1dcde111fc" alt="Set the question order, type, required status and Thai and English messages." width="1265"><figcaption><p>Set the question order, type, required status and Thai and English messages.</p></figcaption></figure>

### 3. Add choices and check the complete form

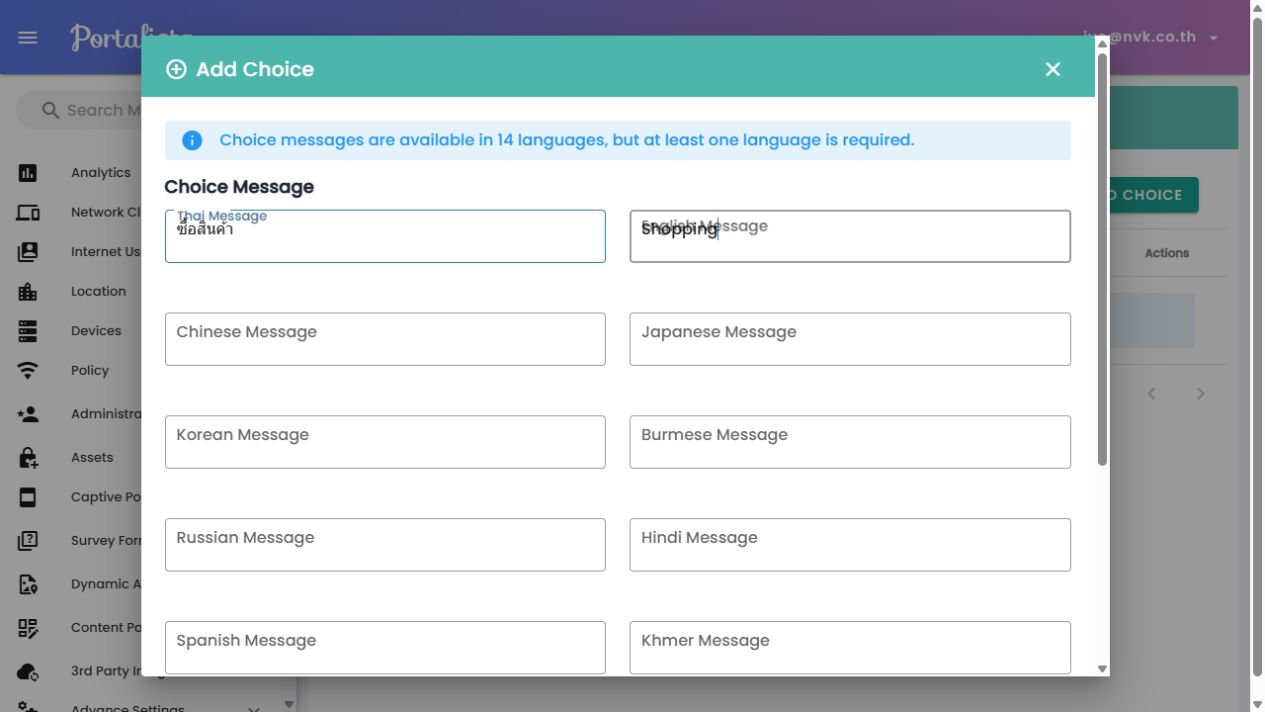
1. For a Choose One or Choose Many question, click its **Manage Choices** icon.
2. Click **Add Choice**.
3. Enter translations for the same answer in **Thai Message** and **English Message**. For example, use “ซื้อสินค้า” and “Shopping” in one choice.
4. Click **Save Choice**, then repeat for every choice in the table. Do not create a separate choice for each language.
5. Return to Questions and check the order, type, required status and number of choices. The example has 5, 4, 5 and 0 choices respectively; questions 1–3 are required and question 4 is optional.

<figure><img src="https://files.gitbook.com/v0/b/gitbook-x-prod.appspot.com/o/spaces%2F6Cj4Z4IgrnDp0c2yiDx4%2Fuploads%2Fr3at5WCoTOIsxraXV8Fj%2F03-choices.jpg?alt=media&#x26;token=cc413560-4115-4f9b-ba1e-17a2bb80df20" alt="Add a bilingual answer choice for a multiple-choice question." width="1265"><figcaption><p>Add a bilingual answer choice for a multiple-choice question.</p></figcaption></figure>

Use **Edit Question** or **Edit Choice** to correct wording. Changes take effect when saved. For a new campaign with substantially different questions, create another form so that the results remain easy to interpret.

<figure><img src="https://files.gitbook.com/v0/b/gitbook-x-prod.appspot.com/o/spaces%2F6Cj4Z4IgrnDp0c2yiDx4%2Fuploads%2FUH3BFGtZauVL74XXUIUp%2F04-overview.jpg?alt=media&#x26;token=9c6ffc10-5274-406e-ac5e-9ea6ceb1acee" alt="The completed mall survey contains four questions covering purpose, interests, satisfaction and suggestions." width="1265"><figcaption><p>The completed mall survey contains four questions covering purpose, interests, satisfaction and suggestions.</p></figcaption></figure>

### 4. Attach the form to a Captive Portal

Creating a form alone does not make it appear to Wi-Fi visitors. Assign it in the target portal's design settings.

1. Open **Captive Portal**, select the intended portal and click **Design**.
2. Open **Username & Password form** for login or **Self Register** for registration, then find its **Survey** settings.
3. For login, enable **Enabled the survey after the user signs in.** For self-registration, use **Enabled the survey after the user has registered.**
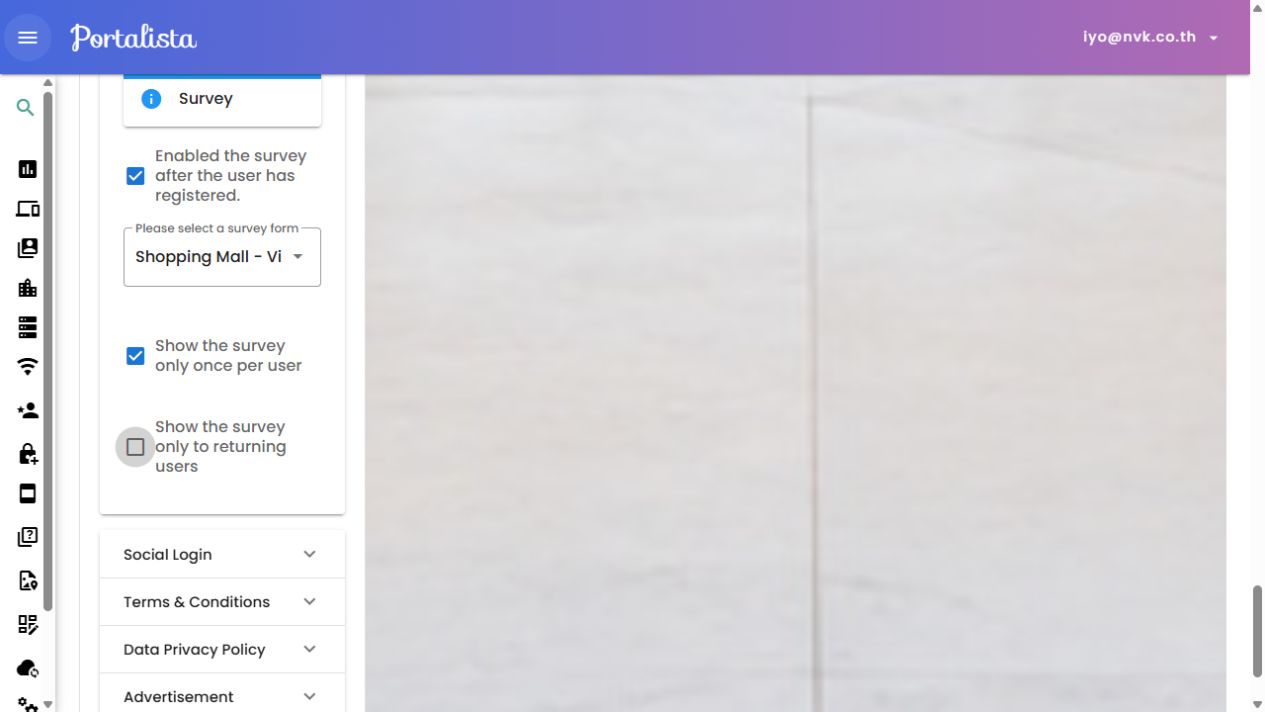
4. In **Please select a survey form**, choose **Shopping Mall - Visitor Experience (Demo)**.
5. For this example, enable **Show the survey only once per user** and leave **Show the survey only to returning users** off.
6. Click **Save & Apply** when you are ready to activate the assignment.

<figure><img src="https://files.gitbook.com/v0/b/gitbook-x-prod.appspot.com/o/spaces%2F6Cj4Z4IgrnDp0c2yiDx4%2Fuploads%2Foe3APUhUV6kUTmAqcQ2X%2F05-assign.jpg?alt=media&#x26;token=56029ec4-b272-4ad3-bbd7-eb7478d385e5" alt="Example survey selection in Captive Portal design settings. This example configuration has not been applied." width="1265"><figcaption><p>Example survey selection in Captive Portal design settings. This example configuration has not been applied.</p></figcaption></figure>

**Once per user:** completion is associated with the Internet User account across survey forms. Assigning a new form does not automatically make previously completed accounts answer again. Test with a suitable new test account when checking first-time behavior.

The Survey controls depend on theme support. Before rollout, test the selected theme and actual login or registration flow, including OTP or email verification if used. Confirm that Thai and English are readable, multiple selections work, required answers are checked, and a successful submission continues the intended Wi-Fi journey.

### 5. View and export results

1. Return to **Survey Form → Manage Questions** for the relevant form.
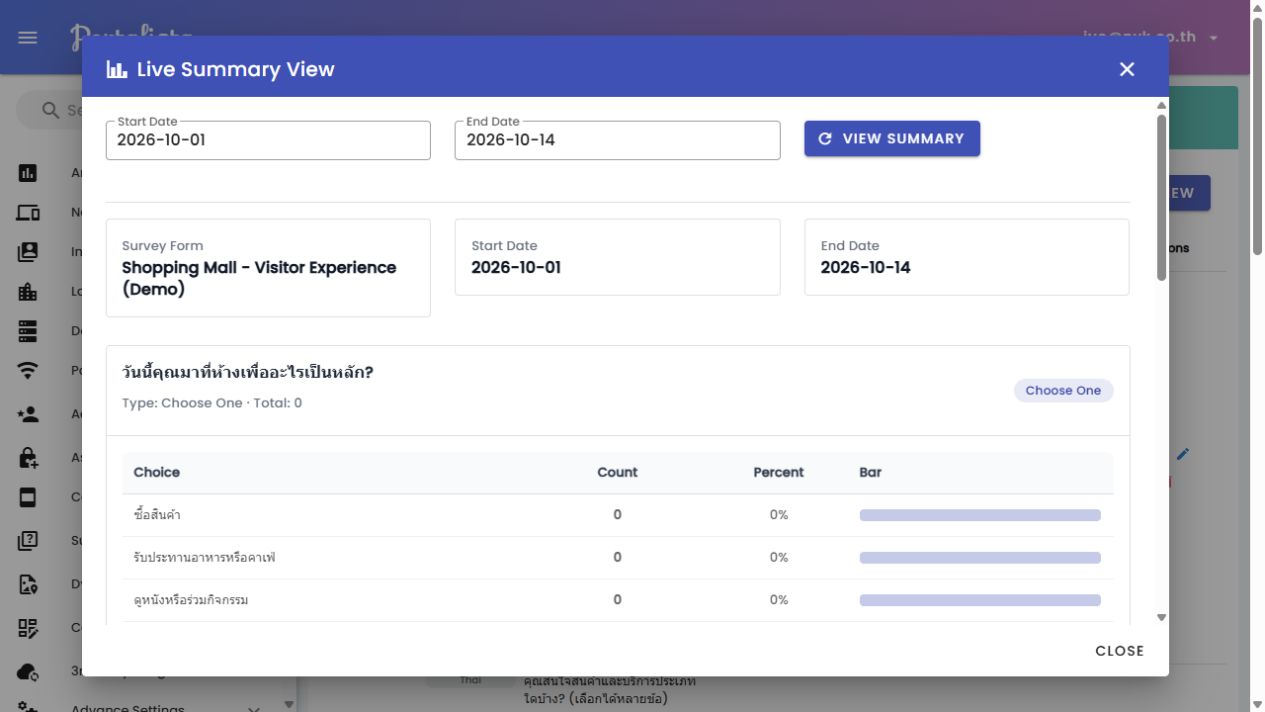
2. Click **Live Summary View**.
3. Enter **Start Date** and **End Date** in **YYYY-MM-DD** format, then click **View Summary**.
4. Review each question's results. Click View Summary again to refresh the selected period.
5. To download Excel, close the summary, click **Export Summary Result**, select the dates and click **Export**.

<figure><img src="https://files.gitbook.com/v0/b/gitbook-x-prod.appspot.com/o/spaces%2F6Cj4Z4IgrnDp0c2yiDx4%2Fuploads%2FkhU41UXoIo5ihYcZ3BMX%2F06-summary.jpg?alt=media&#x26;token=55952322-cfd4-4fb7-addd-dd1957af8b65" alt="Live Summary View displays the selected period and results for each survey question." width="1265"><figcaption><p>Live Summary View displays the selected period and results for each survey question.</p></figcaption></figure>

| Question type | How to read the summary                                                                                                              |
| ------------- | ------------------------------------------------------------------------------------------------------------------------------------ |
| Choose One    | Count shows recorded selections for each choice. Percent compares each count with the question total.                                |
| Choose Many   | Total is the sum of all selections. Percent is each choice's share of those selections, not the percentage of visitors selecting it. |
| Open Answer   | Shows distinct nonempty text answers. Identical text answers are combined in this summary.                                           |

Totals represent recorded answers or selections, not unique shoppers. A new form can legitimately show zero results until responses arrive. The Excel summary contains question sections with choice counts and text answers for the selected dates.

### 6. Use the findings

Compare visit purposes when planning activities, use category interest to guide promotional content, and review satisfaction together with suggestions to prioritize service improvements. Compare equivalent periods and retain the question wording when measuring changes over time.

If the survey does not appear, check the portal assignment, selected login flow, theme support and once-per-user setting. If results are empty, confirm the correct form and date range and that a test visitor completed submission successfully.

#### 7. Test responses through the Captive Portal

**Staging example checked on 16 October 2026:** **aura-mall** uses the Default theme with Survey enabled under **Self Register**, linked to **Shopping Mall - Visitor Experience (Demo)**. Show the survey only once per user is enabled, and returning-users-only is off. Username & Password form is disabled, so this example starts with registration.

1. Open the saved Captive Portal URL. If a Content Page appears first, select Close or Continue to Wi-Fi login to reach the login/registration page.
2. Use a test account that has not completed a survey, then sign in or register using the enabled method. Complete any OTP or email verification steps required by the portal.
3. Check every language you intend to offer. Choose One should accept one answer, while Choose Many should allow multiple choices.
4. Leave a required question unanswered and confirm that submission is blocked. Complete the required questions; an optional Open Answer may remain blank.
5. Submit once, wait for success, and check that the portal continues to its next step.
6. Return to Manage Questions → Live Summary View, select dates covering the test, and click View Summary to check the submitted answers.

**Test Drive and report testing:** Test Drive in the Default theme designer lets you inspect appearance and screen flow, but does not save real responses to reports. Use the actual Captive Portal to verify recorded results. Internet connectivity must also be tested on the relevant Wi-Fi/NAS network.

#### 8. Reading a real summary example

The demo data for 1–16 October 2026 contains one Choose One selection for “Shopping”. In Choose Many, “Fashion and beauty” and “Food and cafés” each have one selection, so Total = 2 and each option shows 50%. This means two selections, not two visitors. These are demonstration results and may change as further tests are submitted.

A blank Open Answer adds no text answer, and identical text answers are combined in the summary. Click View Summary again to refresh the results. The report is grouped by Survey Form and date range; use separate forms when you need clearly separated campaign or portal results.

Live Summary View captured from staging:

<figure><img src="https://2395016443-files.gitbook.io/~/files/v0/b/gitbook-x-prod.appspot.com/o/spaces%2FPH8BiCr2zyKqC7CL3Dxv%2Fuploads%2Fiwlspr3EGlj26Qqw04Co%2F01-live-summary.jpg?alt=media&amp;token=b2e4e3a2-d7df-418c-a270-9e900a2cf1f2" alt=""><figcaption></figcaption></figure>